July 23, 2011

Green Things Pasta

Here's a quick lunch we make thats made from things you probably already have that I thought I would pass on.  Even baby girl loves this so that's saying something...
Green Things Pasta
You need:
2 cups pasta
1/2 cup frozen peas
1 cup broccoli (frozen or fresh)
1/4 cup Italian salad dressing (more or less to your taste)
Parmesan cheese

1. Boil pasta according to directions (no specific kind, just whatever you got), halfway through cooking time add broccoli and peas.
2. Drain, return to pot and add dressing and cheese.
(I love this italian dressing and am guilty of buying it in bulk when it's on sale)

Done!
Perfect for a lazy lunch and tricking little ones into eating green things

ashley


July 11, 2011

Envelope Pillow Tutorial


Baby girl had a really good nap today (aka 2 hours) so after reading lonnymag and getting a little motivation to do something I decided to make some summery pillow covers for a pair of feather pillows I found at GW awhile back.  I did a quick google search (which is how I find out anything) for easy pillow covers and came across a few but I wanted something easier than easy so I made up my own way.  I was really trying to avoid hemming because I hate it so I used a flat sheet I found at a garage sale this weekend and used the hemmed sides for the envelope edges.  Here is how I did it:


FRONT:
1. Measure pillow insert and add 1 inch to each side for seam allowance.  For example, my pillow was 22"x22" so I cut out a piece of fabric at 23"x23".
BACK:
* Pay attentions to where the hem is if your using a sheet.  Make sure it is on the shorter side (the 23" side in my case) so you can use the premade hem.
1. Add 1 inch to the pillow dimensions on one side and 5 inches to the other side.  So my 22" square pillow needed a rectangle 23"x27".
2. Cut your rectangle in half length wise.  My 23"x27" rectangle was cut in half and became 2 pieces each with the dimensions 23" by 13 1/2".
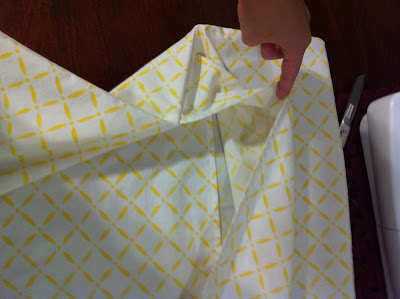
3. Pin the 2 back flaps overlapping each other to the front piece wrong sides out.

1st flap
2nd flap overlapping 1st flap
*I decided to make another pillow cover before bedtime because it was so easy, it would have taken even less time but my "helper" was having a few issues*

4. Stitch around the sides, backstitch the overlapping flaps for extra security.

5. Cut off the corners to allow for a square corner.

6. Turn your cover inside out.


Hope that made some sense, Happy Monday (almost Tuesday) everyone!!

ashley


linking to:


Creative Itch


Anything Related

July 7, 2011

Potty Training

We started potty training today (Dun, Dun, Dunnnnn).  I have no idea what I'm doing but baby girl is loving sitting on this thing.  She's got the "take diaper off and sit" down but we haven't mastered going in the potty.  We've gone on the floor around the potty, many times, but not in; but hey you gotta start somewhere huh.  I don't think she wants to get the potty dirty is the thing (she is a first-born, very meticulous just like momma).  We talked about it and talked about it and I would ask every 10 minutes if she had to potty always receiving the vigorous shake of the head no and realized this is going to be a long trip.  Later, out of the corner of my eye I watched her put a dolly on the potty, pick her up, look at the booty end and said "poo poo" and put her back on the potty. I never knew such simple things like poop and where to put it would boost my confidence as a mommy 1 trillion percent! Doesn't it feel awesome when you teach your child something and you see them "getting it"!
Happy Thursday from the best seat in the house!


ashley

July 5, 2011

Happy 4th!

oh, the things you dig up in a Katrina yard
*oops, this was supposed to be posted yesterday but things got hectic with party planning!
With the long weekend comes lots of home improvement projects which lucky for me hubby enjoys doing.  If you know me or have been reading this blog for a little while you know that we moved into our newly built house in January...what home improvement projects could we possibly have you ask.  Well, our house is a Katrina house here in New Orleans, actually the levee break is about 3 houses down from us, the levee is directly in our backyard so when it broke our house was a goner.  We are lucky to say that we were not living in the house at the time so we didn't lose any personal belongings.  The house was striped down to the studs when we bought it so we had a lot of free reign in how we wanted our home to look and we love how it turned out.  The outside is a different story, the yard has been a field of weeds for sometime and so the boys got to work this weekend.  They started out by cutting down the 15 feet tall weed trees (seriously) then went on to making flower beds.  It was a TON of work made extra difficult since it is summer time here in New Orleans which means 95 degree weather, 100% humidity and random rain showers but it's almost done, we just have the pathways left to do!

digging out the grass that went to fill in bare spots in the courtyard and backyard
we used the ton (literally) of bricks left over from the house to line the planter boxes


ashley

July 1, 2011

Sweet Nothings Bench

First of all, its almost 9:30am and baby girl is still asleep....what the what? I've never been more quiet in my life but I'm sure she will be up before I finish this sentence. Nope, ok let's do this fast!  Yesterday I shared my story of finding this bench:
she's a looker, yes I know.
I sanded down the legs and gave them a coat of primer before spray painting them with Krylon Gloss Dover White (I buy mine at Kmart, it's about 2 dollars cheaper then other places).  I chose a green and white checkered fabric that was sitting in my craft closet (Joann's clearance $2/yd score, BTW check out this fabric I just got yesterday for $3/yd! I'm thinking new nursery drapes one day). 

Pulling each side taut I used a staple gun to attach the fabric onto the top, I made sure to staple into the wood for extra security.  To cover the staples I hot glued natural twisted cord to trim it out the bottom. At this point I was covered in sweat working in our 1000 degree garage and called it done and went to find some air conditioning.  The next day when I went to bring the bench inside I looked at it and it was "too perfect" so I got out the sander and went to town, I figure it's going to get beat up and busted up sooner rather than later anyways.  So here she is, the Sweet Nothings Bench:

and look whose up...


PS. We are starting potty training next week....any suggestions or helpful pointers????? Thanks for reading!

ashley